Author Topic: "Piper's" Restoration Progress  (Read 26530 times)

0 Members and 1 Guest are viewing this topic.

Offline TurdPolisher

  • Member
  • **
  • Posts: 160
  • Bucket List # 3 under way
"Piper's" Restoration Progress
« on: August 05, 2012, 06:54:03 AM »
Hey all,

First off, I enjoy writing so my posts will be long winded but informative about "Piper's" restoration.  I'm not one to be vain, but in the spirit of restoration and since some like pics, I thought I would place my progress reports on the forum for all to enjoy and perhaps chime in on with questions I might have.  Since it has a rather rare interior trim package, she will be going back to stock despite my desires to hot hod her a little. Sure would love to put 350 heads and a cam in her along with a larger exhaust down pipe.  :-\  I scored the car for only $500 to learn how to work on cars, restore a classic, and check something off of my bucket list.  Big bonus for me is she started after sitting for many many years and she was 95% all there. All I really need are wheels that I can restore, new TA tires  and parts that are well worn out and interior seat covers, new carpet, door panels, headliner, etc.

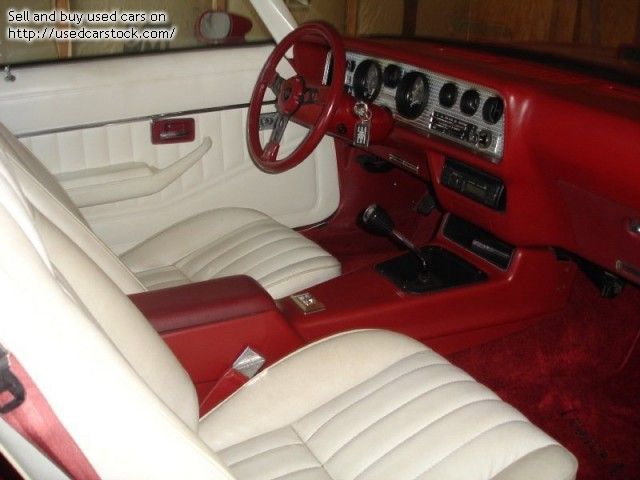
I am guessing it will take 2.5 years to get her back to original....pending available funds. My plan of attack will include a complete frame up restoration as well as interior overhaul.   I will be using 3M restoration products for repair of the plastic trim along with oyster SEM dye. The dash has cracks so I will also be using Dash Filler for the padding once I get the old vinyl torn off of it.  Then new vinyl skin will be applied to the dash and  the console will have some cigarette holes filled and the shot with SEM Carmine vinyl dye after a complete cleaning an prep. The seats will also be redone using Deluxe oyster vinyl....and of course new carmine carpet, pad, sound insulator, oyster headliner and door panels.

The engine compartment  will also be restored with fresh paint and a few coats of primer and Corporate Blue will go onto the engine as well as all new hoses, journal bearings, rings, a cam........bla bla bla depending on the compression and leak down check.

As far as the paint goes, first grind down with 80 grit,  white SPI epoxy primer, some Rage Gold filler, then Slick Sand, guide coat and sand, more slick sand, sand, wet sand,  then 2 coats of primer, wet sand and then a seal coat of white epoxy primer. then the Mayan red will be shot with two coats, then 3 coats of clear. (I think that is how it was described to me.) My goal is to have around 17-20 mil average overall.

The basecoat and clear  will be shot by Todd Cook at Underground Customs here in Redmond.  I am pleased to have such a fine mentor in the bodywork and prep department as people from around the country send their cars to him for paint work and restoration.  His work is nothing short of flawless and amazing.  I promised not tell what he is going to charge me for paint booth time, but happy to say........it is less then what I paid for the car.  :-)  Of course all the body work, primer and prep will be done by myself with him overseeing the progress and noting areas in need of extra care as the prep work is everything.  I imagine I won't have the car to him until late Oct of next year.  The blocking and priming will of course take the most time as will as saving the cash for the interior package, and all the other work that needs to be done.

So for now, I have the interior ripped out, pan was wire wheeled then shot with etcher primer before I put a couple coats of Rustoleum bedliner down.  For now it will sit that way until after she is painted.

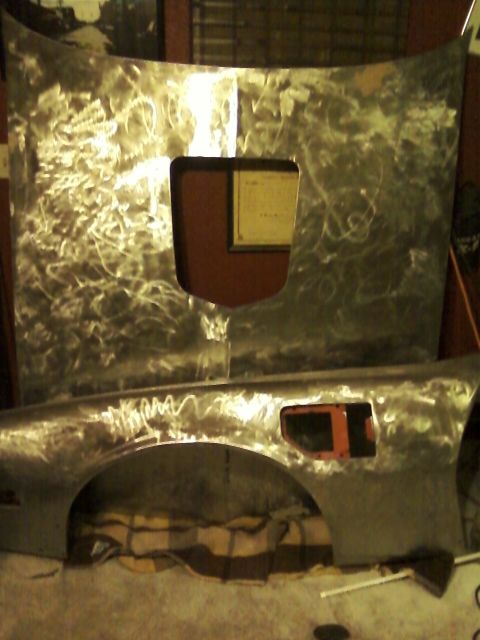
Well, the front clip is almost off and the hood and fenders have been ground down to bare metal.  There they will sit until my compressor arrives and then I will DA all of it with 80 grit......filler from previous damage to 180 prior to applying SPI Epoxy. 

In the meantime, I will be focusing on the engine bay including replacing the bushings of the control arms, sway bar, perhaps ball joints if needed. Of course new paint to the suspension, chassis, inner fender wells and firewall.  Lots of work in the near future.

So for now, how about some pics of her.........her hood looks pretty awesome with grind marks..yeah.........I got carried way as you will see.........would look HOT painted red with the hood bird done in grind marks with orange pearl.  8)

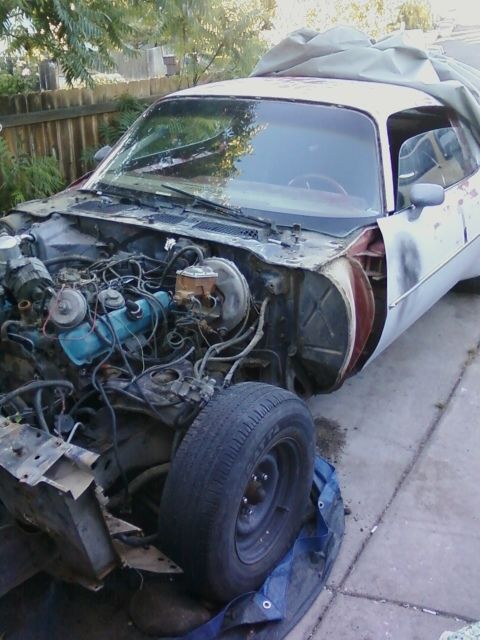
Here is what she looked like in her original state of mind before some yahoo decided to race her on a track or throw her into a ditch. However, I think the number 1 sticker on the door is the give away as to her use. She will be reborn!


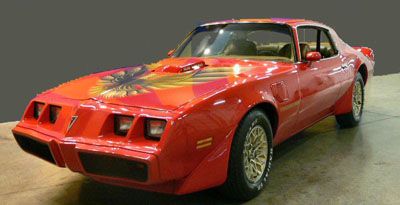
This will look so damn HOT!!


But for now, time to grind down the skins with 80 grit to get a good bite for the filler prior to epoxy primer.


« Last Edit: October 16, 2012, 02:38:23 AM by TurdPolisher »
If you are going to do it wrong........you might as well do it RIGHT!

Offline TurdPolisher

  • Member
  • **
  • Posts: 160
  • Bucket List # 3 under way
Re: "Piper's" Restoration Progress
« Reply #1 on: October 11, 2012, 01:24:04 AM »
Well, I took a little time off from working on "Piper" to save some coin for the well needed parts including Moog control arm bushings for upper and lower arms, upper and lower ball joints, wheel bearings, complete steering linkage, Poly sway bar bushings for the 1 1\4 inch bar, Moog 8002 coils and KYB Gas-Adjust shocks.  I also managed to pick up some "rust wash", epoxy primer to shoot and a couple of cans of rust converter for the  spot areas of the subframe.

Since I have it apart, I might install a WS6 steering box......not sure yet.

In the meantime I have taken a few days to get her broken down and cleaned up and ready to have the engine in her removed this weekend and the subframe pulled. One of the coils on the driver side CAME APART (was already broken) upon removal and the rear sway bar is busted on the driver side. This will be replaced with a 3\4 inch rear sway bar.  My guess it this car was jumped more then a few times.


« Last Edit: October 15, 2012, 12:13:23 AM by TurdPolisher »
If you are going to do it wrong........you might as well do it RIGHT!

Offline Greenbird76

  • Sr. Member
  • ***
  • Posts: 763
  • The way Grandma wishes she could of ordered it!!
Re: "Piper's" Restoration Progress
« Reply #2 on: October 11, 2012, 02:36:20 AM »
So you have a white interior with red accents.  What year is your car?  79,80 or 81?  I have a 76 metalime green esprit with a mostly original white deluxe interior with black accents.  I have also completely rebuilt my car, but for now have her Chevy powered until I get my 78 wc 400 back in order.  Keep on posting pictures and welcome to the forum! 

Offline TurdPolisher

  • Member
  • **
  • Posts: 160
  • Bucket List # 3 under way
Re: "Piper's" Restoration Progress
« Reply #3 on: October 14, 2012, 11:12:58 PM »
So you have a white interior with red accents.  What year is your car?  79,80 or 81?  I have a 76 metalime green esprit with a mostly original white deluxe interior with black accents.  I have also completely rebuilt my car, but for now have her Chevy powered until I get my 78 wc 400 back in order.  Keep on posting pictures and welcome to the forum!

Yeah man, she's white and red which I thought was pretty rare as I had never seen one before except on just one photo I could find on the net with the help of another member on here.  She's a 79.  Somehow along the way the seats were restored as the sides are white with red cloth which didn't make any sense to me at all. It was later confirmed by Hitman to be the wrong seats indeed.  But her cowl plate reads it as a 12N interior deluxe package...so that is what she will go back to.

 I have read some of your posts and you have been of some help so far.......thanks!  So, do you have a black dash and console, white seats, headliner and doors then{  That must be a great combination too.  I too am looking forward to getting her done so I can look back and say............I built this!  Thanks for the welcome..........I'll be around for a while!  ;D
« Last Edit: October 15, 2012, 12:15:50 AM by TurdPolisher »
If you are going to do it wrong........you might as well do it RIGHT!

Offline TurdPolisher

  • Member
  • **
  • Posts: 160
  • Bucket List # 3 under way
Re: "Piper's" Restoration Progress
« Reply #4 on: October 14, 2012, 11:24:41 PM »
Well this weekend went well as I had fun listening to classic rock nice and loud from my garage as I pulled the motor to get her ready for the subframe removal and restoration as well as  the firewall clean up and wire wheel work then paint.  Next step is an engine stand start up for a compression and leak down test to determine the health of the engine before I tear into her this winter. Then again, I may just opt to hook her up to a vacuum gauge and let that tell me what is up. Sure would be nice to know all she will need is a hone job, new rings, bearings and gaskets.  But the test will tell.  Thanks to YouTube and a shop manual, I will be able to learn it all and get er done myself.  If I can get her completely restored for a $4500 investment, I will be stoked!  Just try to buy a new car you can work on for that!  Most important is I'll be restoring a car that was made in the USA and made America what it was before we started sending work overseas due to corporate greed..............but I digress!

« Last Edit: October 15, 2012, 12:25:45 AM by TurdPolisher »
If you are going to do it wrong........you might as well do it RIGHT!

Offline Greenbird76

  • Sr. Member
  • ***
  • Posts: 763
  • The way Grandma wishes she could of ordered it!!
Re: "Piper's" Restoration Progress
« Reply #5 on: October 15, 2012, 10:37:45 AM »
Hey nice work so far man! 8)   I have been fascinated with rare interior options since I found my car.  I too had know idea white interiors were options and never saw one until I went to look at my present car.  The awesome thing about mine is it is mostly original and the interior and exterior codes match- metalime green with white/ blk deluxe interior.  I really do not care that it left the factory as an Esprit.  I have a rare color combo car that turns a lot of heads even with the old 37 year old paint job. 
Here are some pictures of white interior optioned interiors I have found on the web.  these are all from 1976.  I love the horse collar deluxe seats. I included two pics of the white/ red one for ya since that car is a museum car and is superb.  The white and black one is my actual car.
« Last Edit: October 15, 2012, 11:37:43 PM by Greenbird76 »

Offline NWW-79 T/A

  • Adv. Member
  • ****
  • Posts: 1882
  • 16 Year Old T/A Owner
Re: "Piper's" Restoration Progress
« Reply #6 on: October 15, 2012, 10:50:20 AM »
Great work man. Keep it up!
Romney/Ryan 2012

-1979 Solar Gold Trans Am in Restoration-

Offline TurdPolisher

  • Member
  • **
  • Posts: 160
  • Bucket List # 3 under way
Re: "Piper's" Restoration Progress
« Reply #7 on: October 15, 2012, 09:10:21 PM »
Hey nice work so far man! 8)   I have been facinated with rear interior options since I found my car.  I too had know idea white interior were options and never saw one until I went to look at my present car.  I awesome thing about mine is it is mostly original and the interior and exterior codes match- metalime green with white/ blk deluxe interior.  I included two pics of the white/ red one for ya since that car is a museum car and is superb.  The white and black one is my actual car.


Thanks, for never doing this before, I'm learning a lot and having a blast doing it.  Sure hope I can put it back together, but with all the pics I have taken and the bagged nuts and bolts....I think thing will go smoothly.........so long as I don't lose my pics due to computer failure.

Wow, the black and white looks awesome!  I too think it is so unique to have these interior combinations as they really get set apart from the others for their uniqueness. That is a first for seeing the blue and white and black and white........not sure I like it (blue and white)  as much as the red and white or the black and white that we have.  Either way, I like different!  Yours is in great condition where mine.............is pretty shot but I'll get her looking new.  8)
If you are going to do it wrong........you might as well do it RIGHT!

Offline TurdPolisher

  • Member
  • **
  • Posts: 160
  • Bucket List # 3 under way
Re: "Piper's" Restoration Progress
« Reply #8 on: October 15, 2012, 09:17:17 PM »
Great work man. Keep it up!

Thanks man, so you are 16{  Wow ya know I always wanted to learn how to work on cars and take shop class in High School..........but I guess my folks didn't want to have a kid who was into fast cars and having greasy finger nails all the time.  They wanted a Dr.  and I wanted to be a rebel.  Some things never change!   >:D
If you are going to do it wrong........you might as well do it RIGHT!

Offline TurdPolisher

  • Member
  • **
  • Posts: 160
  • Bucket List # 3 under way
Re: "Piper's" Restoration Progress
« Reply #9 on: October 16, 2012, 02:27:51 AM »
Busy Busy but fun times.  Today I managed to drop the subframe with no problems.  Lucky for me the car had no rust having spent its time sitting in the dry high desert of Redmond, OR.  Lucky for me the PB Blaster used on the subframe mounts did its job well  and after soaking over night, they came out without a hitch.

Although it would me nice to be able to just drop this thing off at and have it acid dunked to get the grease and grime off, I figured doing it old school with some elbow grease would be far more rewarding and I want to do the work myself. I opted not to sand blast it as the sand can imbed itself in the frame and it gets everywhere.........plus, my 4 hp 28 gallon compressor isn't quite big enough to keep up with the 90 cfm needed for long work sessions.

Here is what I will be using for the  resto  job on the subrame and undercarriage.


For the restoration of this iron pig, I decided it would be worth the time to first scrap off all the baked on grease and grime from oil leaks and road tar using just a wood chisel. The sides that are also kinda sharp made for easy scraping of the crud prior to using a 3 " cup wire wheel.  The black paint removal wheels works great too. With the wire wheel the goal as to simply further break up the greasy crud. Pay close attention to the welded seams.  Remember your safety gear especially safety glasses as grime and the wire wheel wires will fly EVERYWHERE including your face and clothes.  (cashier at Home Depot pointed out that I had something stuck in my nose, It was a piece of wire!)

Following that using a good pre paint grease and wax remover to get the grease off with rags is the trick.  I thought I would save some coin and simply use some Acetone for the job I had sitting in the shop.  Sure it might be a bit hot and flash off fast, but since it is used to thin the epoxy primer I will be using, I don't foresee any compatibility issues.  Check first with the Epoxy primer spec sheet you will be using as some like SPI recommend a water based wax grease remover NOT THINNER.

The key to any paint job is a clean, clean, clean sub-surface.  Following getting the grease off and whipping down everything with whatever you choose to use in accordance to the spec sheet, use 120 or 180 to scuff the surface EVERYWHERE! I like my paint to have somewhat of a rough surface for adhesion.  Then wipe it all down again. Remember rubber gloves at this point as your finger oils can cause the primer not to stick  or "fail" in that area when those areas you touched. Remember clean clean clean!

Following the clean up with gloves, I lightly sprayed the surface rusty areas with Rustoleum Rust Converter paying attention to the welded seams as this is where most of the surface rust will be due to it being  hard to get all out with the wire wheel.  Just a light spray will be enough to convert the rust to a paintable Iron Phosphate surface.  Adhesion is KEY to keep all your hard work from peeling. PAY ATTENTION to the label and make sure it can be used in temps around 250 degrees. They also make a rust wash that is pretty cool stuff . I will be using that on the under carriage for sure prior to the epoxy primer.  But for the frame all is fine with the stuff in the can.  That is if you choose to use it as epoxy primer in intended to seal the steel.  My thought is just to convert, THEN seal with epoxy primer then topcoat with either PPG ST1202 or the ready to go Eastwood underhood, with a two light coats then a medium coat........wait two days, scuff with green scotchbrite or 400 grit, then one more coat  of paint after a wipe down for added durablity.  Wiat at least two days before assembly

Thought I would share my subframe stand made out of scrap 2X4s on 5 gallon buckets.  It is strong enough for me to stand on. Only a slight trim width wise is needed for it to fit into the ends.  It is the perfect height for me to later install my control arms, coils, shocks and my restored wheels when I get around to it. A simple flip will allow me to get to the bottom and is high enough for me to paint under.


Now let the cleaning begin! Garden hose clean ed up with de-greaser. 


And all cleaned up looking sharp with 2 coats  black Epoxy Primer and 3 coats of  PPG ST1202 with a little hardener.    Personally I love the sheen of this satin Black. 8)


Now the fun part, Putting it all back together with all new parts that tend to wear out after 33 years or so.  More to come guys.


« Last Edit: October 20, 2012, 02:19:39 AM by TurdPolisher »
If you are going to do it wrong........you might as well do it RIGHT!

Offline NWW-79 T/A

  • Adv. Member
  • ****
  • Posts: 1882
  • 16 Year Old T/A Owner
Re: "Piper's" Restoration Progress
« Reply #10 on: October 29, 2012, 09:52:25 PM »
Man, you put a lot of work into that. Nice job.
Romney/Ryan 2012

-1979 Solar Gold Trans Am in Restoration-

Offline snowman454007

  • Jr. Member
  • *
  • Posts: 21
Re: "Piper's" Restoration Progress
« Reply #11 on: November 20, 2012, 12:18:38 AM »
Awesome Name!!!!! Thats what my 77's Name is and Piper was my 1st car!!! Lookin good!!!

Offline NWW-79 T/A

  • Adv. Member
  • ****
  • Posts: 1882
  • 16 Year Old T/A Owner
Re: "Piper's" Restoration Progress
« Reply #12 on: November 26, 2012, 01:52:55 AM »
How's it coming along?
Romney/Ryan 2012

-1979 Solar Gold Trans Am in Restoration-

Offline TurdPolisher

  • Member
  • **
  • Posts: 160
  • Bucket List # 3 under way
Re: "Piper's" Restoration Progress
« Reply #13 on: December 01, 2012, 11:57:15 PM »
Awesome Name!!!!! Thats what my 77's Name is and Piper was my 1st car!!! Lookin good!!!

Thanks man, yeah she got her name on the day I met her.  She sat in the hot summer sun under blue sky in dry and beautiful Central Oregon.  Under her hood, she looked like she needed a drink of life.  After I unhooked her drinking tube and dunked it into a fresh container of 87 octane fuel, I cranked her over.  Chug, chug, chug she went until a fire in her belly blue a puff of smoke out of the tail pipe as she said.............."My name is Piper..........take me home".  I fell in love with the girl at that moment.  ;D
If you are going to do it wrong........you might as well do it RIGHT!

Offline TurdPolisher

  • Member
  • **
  • Posts: 160
  • Bucket List # 3 under way
Re: "Piper's" Restoration Progress
« Reply #14 on: December 02, 2012, 12:19:25 AM »
How's it coming along?

Coming along quite well little man!  I have been busy with so many things and loving every minute I haven't posted as of late.  The entire front end is complete with all new Moog control arm bushings, upper and lower ball joints( PITA), wheel bearings, 8002 coils (even more of a PITA), KYB Gas adjust shocks, brake calipers (they were missing), brake hoses, shoes, Poly bushings from Energy Suspension for the sway bar, and another coat of paint on the chassis after I ran a green brillo pad over it and wiped her down with wax degreaser.  I made sure not to torque down the control arms until I have the motor in to settle the springs down.


It is now out of the garage under a tarp and I'm ready for phase two of the operation to bring "Piper" back to life.  The rear clip will be rolled in tomorrow as I'm ready to strip her down top to bottom of it's old paint and readying it for undercoat, new gas tank (huge dent in it), rear leafs from Eaton, 5\8ths inch rear sway (broken), bushings bla, bla, bla.  Tranny will also be rebuilt with a shift kit and the works.  I will be putting 3.42 ( more on this in a second) gears in the rear and of course rebuilding the axles with new bearings\seals, brake rebuild with pads etc. 

I'm not sure you know but when I broke down the engine, sadness and a little tear came into my eye as I looked down in the lifter valley and noticed I had a cracked block!  :'(  I might be able to eventually pin stitch it using Lock-n-Seals or even welding it (I know a great welder) either one with a specialty block seal compound from Germany, but that will be in the future.  This man was uber bummed as she was a numbers matching car.


But I have to look on the bright side, I only paid $500 for her so WTF!
 !!!!!!!DRUM ROLL!!!!!!!!  I  get to mildly hot rod her after all!

The car gods shined upon me last Wednesday when my neighbor came over with an ad for a 78 L78 400.  8) ...the reason for the 3.42 gears. It came out of a Bonneville and is was super super clean, new starter, fuel pump, and I would imagine maybe a Qjet carb as I can't imagine one would look this good after 32 years or so. I just had to pull the trigger on it as I scored it from another Pontiac guy with a Formula for only $200.  ;D  Life is good!  Compression check to come soon.  The only reason why the gentleman offed it was because he knew a guy that already had a rebuilt W73 .030 over with a hot cam that he picked up for only $800!!  :o (my honest reaction when he told me). I guess it pays to have friends in the the car world. Keep an eye out in the power train section for my engine rebuild plans.

« Last Edit: December 02, 2012, 07:40:03 PM by TurdPolisher »
If you are going to do it wrong........you might as well do it RIGHT!