rkellerjr and a couple of others have asked me about cleaning new hydraulic lifters. Here's something I put together concerning this with pictures. While this posts is quite long, it covers an important step in building a bullit proof engine.
Almost all hydraulic lifters are built in the same manner. I believe there's only a couple of companies even producing hydraulic lifters for all the different vendors. So these pictures and outline should apply to almost all hydraulic lifters.
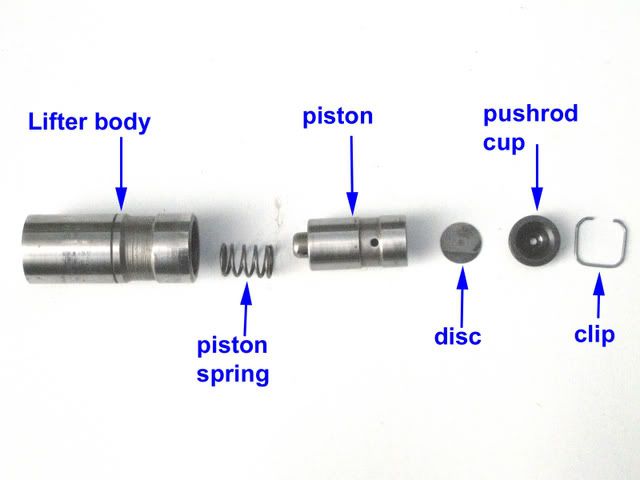
All pictures show the parts as they would be assembled in the lifter.
Why are we cleaning brand new lifters you ask? Because brand new lifters are not always perfectly clean. The inner piston is ground to a very tight fit with the lifter body. A small piece of grit left behind from manufacturing can jamb the 2 pieces together, preventing them from working properly. Or, some pieces of of debris can get lodged between the check ball and it's seat in the piston. This will result in collapsed lifters, because the lifter can not hold pressure in the lower section of the lifter body. While these problems are rare, they do happen from time to time. Just ask Rich over at TAC & 78ta. I once found a piston that had pitted walls from an improper casting, that was ground to size, and then passed.


So, disassembly & cleaning is
your chance to be sure everything is
CLEAN & OK. Find a flat, level surface to work on. Make sure your workspace is clean. You don't want to introduce more dirt & crud back into your lifter than you removed.
Work on 1 lifter at a time. You shouldn't be mixing up parts between them, especially the lifter bodies and pistons.
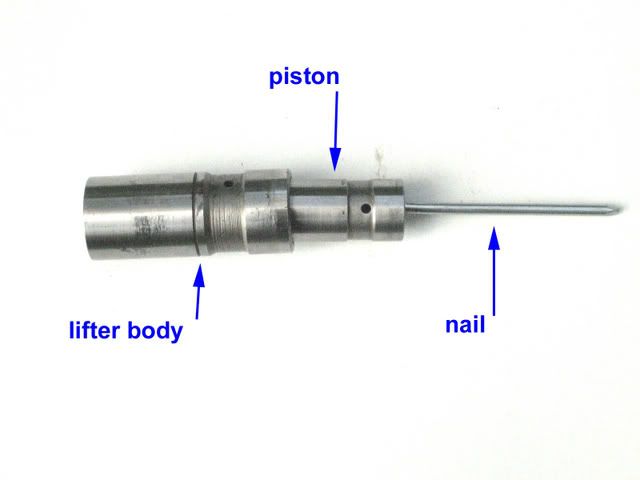
Tools - a sharp pointed tool or small scredriver, a small diameter nail with a flat head & a blunted tip (a roofing nail is ideal), a container (such as a margarine container), your favorite parts cleaner (brake cleaner works well), compressed air (even the canned air for cleaning electronic components will work if you don't have a compressor), and some clean engine oil
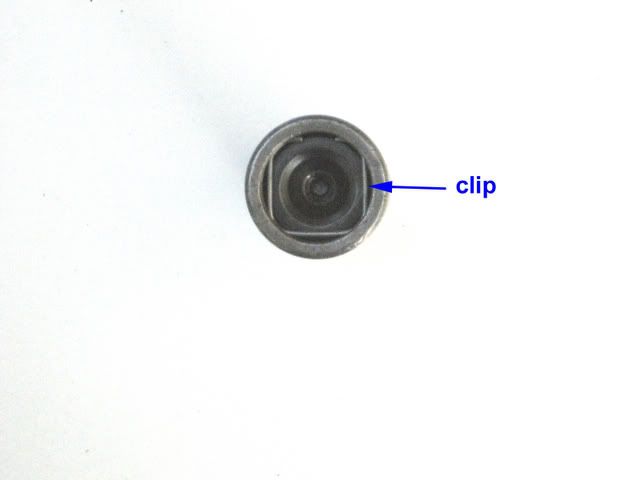
Start by prying out the clip located at the top end of the piston.
Under that should be a push-rod cup with a thin, flat , metal disc under it. Remove these 2 parts.

Next remove the inner piston and it's spring. The inner piston may pop up on it's own after removing the clip, but chances are better that it wont. Hook the head of the nail inside the piston and try to remove it. If it still wont come out, turn the nail over and insert it to the bottom of the piston, blunted, pointed end first. If you look inside the piston first, you'll notice a hole at the bottom. The check ball is located on the other side of this hole. You need to depress the check ball, thus releasing the hydraulic pressure inside. You'll hear a popping sound and the piston should sink into the lifter body. Now take the head of the nail and remove the piston as I outlined above.
Now comes the fun part. Use a small screwdriver or other pointed tool, pry the check ball cup off the bottom of the piston. The cup is a spring metal; all it needs is to be pushed to one side and it should come off. A lip around the edge of the piston holds the cup in place.
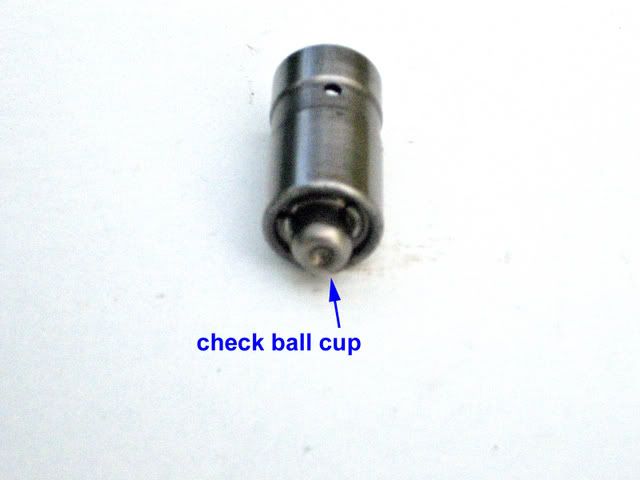
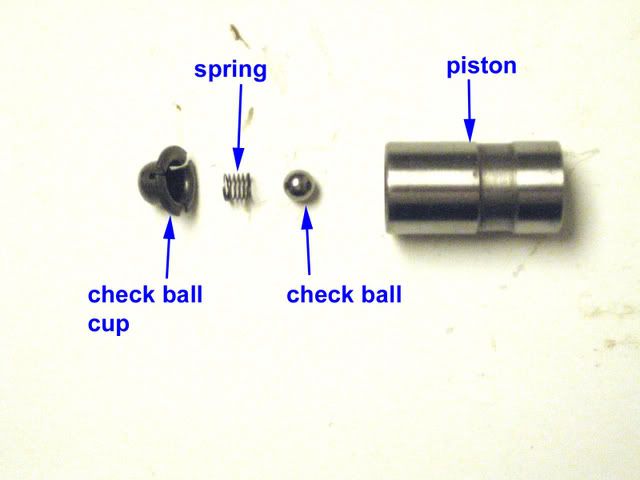
Try to do this in a container of some type, because there is a small spring and steel ball located under this housing. They will try to disappear on you.
With all the parts removed, clean everything thoroughly with your favorite cleaning product. Avoid using rags unless they are lint free. Using some kind of compressed air to blow out the parts is best.
Inspect all the parts. Pay close attention for pitting or cracks in the walls of the lifter body and pistons.
Any problems you discover should be followed by a call to your supplier for a replacement. Assembly is the reverse of removal. Reassemble the check ball assembly to the bottom of the piston. You'll need to push the cup to one side to get it to seat. Be sure to put the spring and check ball in properly. The picture shows the small parts as they are assembled.
Pour some oil into the bottom of the lifter body. Fill it about 1/2 way to the hole in the side of the lifter body. Drop the spring into it's bore; Be sure it is seated properly. Apply oil to the outside of the piston before installing it. Insert the piston and push down. You want to push the piston down far enough to install the remaining parts. You will need to take your nail and depress the check ball again. This should allow the piston to sink into the lifter body far enough to install the remaining parts. If you can not get the piston to sink in far enough, stop, remove the piston, and check the spring. It probably got dislodged. Also the ball needs to be held off the seat (down) while pushing the piston down.
Install the disc, push-rod cup, and the clip.
Be sure the clip is seated properly at all 4 corners. If not, it will pop out and the lifter may disassemble itself while running.
You can soak the lifter in a can of oil before installing if you want to. Be sure to coat the bottoms of the lifters and the cam lobes with assembly lube when it's time to install.
Now that you've cleaned and checked them, everything should be fine. One less thing to worry about.
If unsure about anything above, you can post up questions to me here.


