Author Topic: Engine Bay Detail and Cam Swap UPDATE (with pics)  (Read 5676 times)

0 Members and 1 Guest are viewing this topic.

Offline 1976T/A

  • Jr. Member
  • *
  • Posts: 50
Engine Bay Detail and Cam Swap UPDATE (with pics)
« on: April 06, 2009, 07:20:45 PM »
Hi all-

I'm not new to this site but I am definitely more of a "reader" than a "writer." If it wasn't for this forum and a couple others, I would never be doing this project.

Started this primarily just to detail the engine compartment, but now that I have so much torn down, I am probably going to do a cam swap, too.....BUT will be needing your help, please ??.....never done that before. After much research, I've decided that the Comp Cams XE262 is the right one if (and that's a big 'if') I can use the existing stock valvetrain with a slight conversion to 'adjustable' to accommodate the added lift of the new cam. Will need your advice.

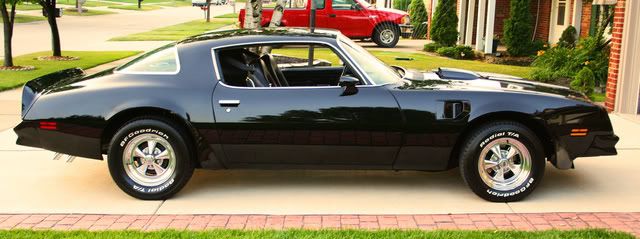
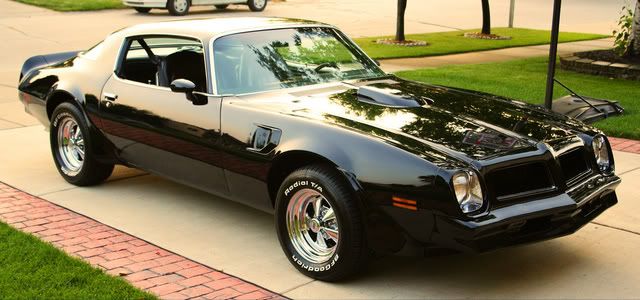
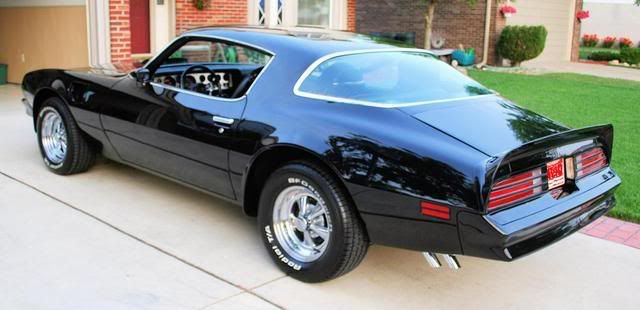
First, here's the car. It's a 1976 T/A with 47,000 original miles. All sheet metal and interior is original. L78 400ci automatic. Only mods have been a set of headers and some 3.42 rear gears. Paint is about 4 years old. Car has been in the family since 1983 and legally became mine about 7 years ago. I've already spent a ton of time and $$ getting it to where it is, but am having a blast doing this !!


Engine bay before project began:


Parts removed:


Intake all cleaned up with a wire wheel, primed and painted. EGR block off plates fabricated and installed along with a couple of additional EGR plugs:


Various brackets also hit with a wire wheel, primed and painted:


Inner fenders removed. Have the inside and outside of one degreased, wire wheeled and just started shooting some primer:


Been under the hood, too, removing rust and other crud. You can't really tell from these pics, but I've done quite a bit:


Will be ordering a bunch of new parts, including new A/C compressor, radiator, hoses, belts, water pump, brake booster and master cyl., plugs, wires, VIR valve, and a handful of other things.

So, I'm hoping if I get stuck, I can solicit some help.....especially with the cam swap ???

Thanks.

Paul
« Last Edit: May 24, 2009, 10:48:03 PM by 1976T/A »


Circumstances are no more responsible for your attitude than a mirror is for your looks.

Offline KeePat

  • Member
  • **
  • Posts: 448
  • When I finish my T/A I will change my avatar!
Re: Engine Bay Detail and Cam Swap (with pics)
« Reply #1 on: April 06, 2009, 07:37:37 PM »
Paul, Your T/A looks great and the cragars with the black, Awesome! Looks like your off to a good start under the hood, good luck and keep posting the pictures along the way!
Pat

Offline Rick

  • Global Moderator
  • Lifetime Member
  • *****
  • Posts: 7940
Re: Engine Bay Detail and Cam Swap (with pics)
« Reply #2 on: April 06, 2009, 08:06:32 PM »
That's looking pretty good!  How are you going to do the choke?  Convert to electric?  I note that you've made a block-off plate for the hot air feed to the choke, which is why I'm asking. ???

Your intake manifold looks good.  I think you made the right choice in deciding to go with the correct "stratospheric" blue for the 75/76 engine. ;)

Offline ponchonutty

  • Adv. Member
  • ****
  • Posts: 1747
Re: Engine Bay Detail and Cam Swap (with pics)
« Reply #3 on: April 06, 2009, 08:16:51 PM »
Looking good!  Please pick up the pace with more pictures too since I'll be doing the same exact thing in a week or so.  I'm very curious to see how well this turns out with out pulling the motor.  I was planning on pulling mine.
Rich enough to own a TA, too poor to keep'm all ;)
1980 TA (1st car)
1989 Formula
1976 400 4sp
1976 400 auto
1978 WS6/W72 4sp
1970 455 4sp Formula clone
1980 Indy Pace TA

Offline SoonerTA

  • Adv. Member
  • ****
  • Posts: 2164
Re: Engine Bay Detail and Cam Swap (with pics)
« Reply #4 on: April 06, 2009, 08:23:49 PM »
Great looking car!!  Love the black!

Offline RRR76TA

  • Ohio Firebirds
  • Adv. Member
  • ****
  • Posts: 2564
Re: Engine Bay Detail and Cam Swap (with pics)
« Reply #5 on: April 06, 2009, 09:05:49 PM »
Looks nice . One question where do you live?

Offline 1976T/A

  • Jr. Member
  • *
  • Posts: 50
Re: Engine Bay Detail and Cam Swap (with pics)
« Reply #6 on: April 06, 2009, 09:09:23 PM »
Paul, Your T/A looks great and the cragars with the black, Awesome! Looks like your off to a good start under the hood, good luck and keep posting the pictures along the way!
Pat

Thanks, Pat. I wish I had the patience and know-how to get my stuff looking as good as yours. What you are doing to that '72 is amazing !!


That's looking pretty good!  How are you going to do the choke?  Convert to electric?  I note that you've made a block-off plate for the hot air feed to the choke, which is why I'm asking. ???


Well, if my understanding is correct, I won't need that hot air feed as I never run the car when it's cold out. I did some research and I don't *think* I need it ?


Looking good!  Please pick up the pace with more pictures too since I'll be doing the same exact thing in a week or so.  I'm very curious to see how well this turns out with out pulling the motor.  I was planning on pulling mine.

Will try to keep the pics coming. Things may slow down a bit for the next week or so.  Even with the engine in the car, I expect it to come out pretty good. A little tougher getting all the grime off, but with patience and some elbow grease, it's getting there. I almost pulled the engine.


Looks nice . One question where do you live?

I am a Michigander !!


Thanks for all the compliments, too !!!


Circumstances are no more responsible for your attitude than a mirror is for your looks.

Offline RENOVATIONS

  • Administrator
  • Lifetime Member
  • *****
  • Posts: 10623
Re: Engine Bay Detail and Cam Swap (with pics)
« Reply #7 on: April 06, 2009, 09:57:40 PM »
Your intake manifold looks good.  I think you made the right choice in deciding to go with the correct "stratospheric" blue for the 75/76 engine. ;)

Totally agree  ;D


Great looking '76 and good work so far ;)
Jeff

Projects:
_____________
1978 Trans Am
1970 Camaro
1970 'Cuda
1987 Fiero GT
1982 Trans Am
1986 Corvette

Offline Rick

  • Global Moderator
  • Lifetime Member
  • *****
  • Posts: 7940
Re: Engine Bay Detail and Cam Swap (with pics)
« Reply #8 on: April 06, 2009, 10:35:04 PM »
Well, if my understanding is correct, I won't need that hot air feed as I never run the car when it's cold out. I did some research and I don't *think* I need it ?

Well, you have to understand "cold" in the automotive world.  "Cold" to an engine of this vintage (1976) is when it is operating at any temp of less than 195 degrees F.  It's really not connected to the absolute outside temperature, although when it's 0 degrees outside it obviously takes the engine longer to get to 195 F than it does when it's 100 F outside.

You see, the choke provides a richer air/fuel ratio to the engine so it will better when it is "cold" (less than 195 F).  That helps keep the engine running, as at temps lower than that the air/fuel ratio isn't steady.  It will go "lean", and the engine will stall.  This will continue, with erratic engine operation, until the engine gets "hot" enough for the air/fuel ratio to stabilize.  The biggest factor affecting engine warmup is the termperature of the intake manifold, which is why the exhaust ports crossover right under the carb.  The idea is to use the exhaust gas to heat up the intake, which helps vaporize the fuel coming out of the carb, and thus providing more uniform air/fuel mixture to the intake ports.

If you don't have a choke, the car will stall and die repeatedly until the intake manifold gets warm enough to do that.

So -- do you need the hot air supply to the choke?  No, not if you essentially disable the choke.  If the choke is enabled (working), then without that hot air supply it will never disengage.  That chokes off your engine and prevents it from developing full power from full air flow through the carb.  Also, if its setup right, your secondaries won't open because they will be "locked out" by the choke that doesn't open.  That's why most people without a working hot air supply have their chokes disabled -- intentionally, as the car won't make any power with it working.  They just put up with the crappy running until the car reaches operatiing temperature.

It's a driveability issue that helps with emissions.  A working choke doesn't harm power at all, and makes the car easier to start and drive.

Offline 1976T/A

  • Jr. Member
  • *
  • Posts: 50
Re: Engine Bay Detail and Cam Swap UPDATE (with pics)
« Reply #9 on: May 24, 2009, 10:46:14 PM »
Almost finished. Just have some minor touching up to do and will need to have the A/C system checked and charged. This project has been a ton of work.....but I have honestly enjoyed doing it and I'm pretty pleased with the results. It's not 'hard' work and I didn't run into any major problems but it was time consuming and tedious getting 33 years worth of grime, grease, and rust off of everything. The only part I'm not 100% pleased with is the alternator. Tough to find a brand new 27si for a reasonable price so I ended up cleaning the one I have as best I could. I didn't paint the case but I did paint the fan. I decided against doing the cam....maybe next year. I just didn't feel confident enough with my limited skills to get into the engine internals. But, now that I have a good feel for how everything comes apart in order to get to the inside of the engine, I'll be a little more confident doing it. Tell you what, I have a whole new respect for the guys who do any kind of 'restoration' for a living. It is a time consuming a tedious job. I would guesstimate I put in somewhere around 115 hours which includes tracking down all the parts and ordering them and/or picking them up.

New stuff:

A/C Compressor
VIR Valve
Water Pump
Hoses
Distributor
Spark Plugs
Belts
Master Cylinder
Brake Booster
Radiator Overflow Bottle
Washer Fluid Bottle
Radiator
Fan clutch
Radiator Cap
Valve Covers
....and a bunch of other small things I can't think of right now.

These aren't the greatest pictures but it was later in the day and the light wasn't all that great. Would have liked to have gotten some good pictures of the upper control arms, the inner wheel wells (which were removed, stripped to bare metal, primed, and painted)...and the frame rails.....which all came out really nice.

BEFORE


AFTER


Circumstances are no more responsible for your attitude than a mirror is for your looks.

Offline RENOVATIONS

  • Administrator
  • Lifetime Member
  • *****
  • Posts: 10623
Re: Engine Bay Detail and Cam Swap UPDATE (with pics)
« Reply #10 on: May 25, 2009, 02:51:38 AM »
Again, that REALLY looks good...excellent work!  ;D
Jeff

Projects:
_____________
1978 Trans Am
1970 Camaro
1970 'Cuda
1987 Fiero GT
1982 Trans Am
1986 Corvette

Offline 72blackbird

  • Adv. Member
  • ****
  • Posts: 2077
  • Old Birds don't die-they get faster, corner harder
Re: Engine Bay Detail and Cam Swap UPDATE (with pics)
« Reply #11 on: May 25, 2009, 03:10:30 AM »
Paul,
Fantastic job on the engine bay detailing- totally an inspiration of how I hope my engine bay will look one day. My poor T/A is still w/o an engine (in process of looking for a complete engine now)- at least I have the 'before' pic LOL.


Geno

Offline SoonerTA

  • Adv. Member
  • ****
  • Posts: 2164
Re: Engine Bay Detail and Cam Swap UPDATE (with pics)
« Reply #12 on: May 25, 2009, 03:31:59 PM »
Wow...I am very impressed with how it all came out.  I have my front suspension ripped out of the car and think that this would be a good time to do exactly what you did!  Thanks for the inspiration!  :)

By the way...your alternator looks great!

Offline jphillips3333

  • Lifetime Member
  • *****
  • Posts: 4809
Re: Engine Bay Detail and Cam Swap UPDATE (with pics)
« Reply #13 on: May 25, 2009, 03:46:14 PM »
Looks fanstastic Paul - great job!
John

                                 1 of 1107                     1 of 37,015                    1 of 1817

Offline 4speed76

  • Sr. Member
  • ***
  • Posts: 1222
Re: Engine Bay Detail and Cam Swap UPDATE (with pics)
« Reply #14 on: May 25, 2009, 03:47:44 PM »
That looks nice and clean.  Good work.
1976 T/A project
2009 Honda CRV
2001 Honda Civic