Author Topic: Bull's 1976 Trans Am Project  (Read 7113 times)

0 Members and 1 Guest are viewing this topic.

Offline Bull

  • Jr. Member
  • *
  • Posts: 90
Bull's 1976 Trans Am Project
« on: November 16, 2014, 12:10:50 AM »
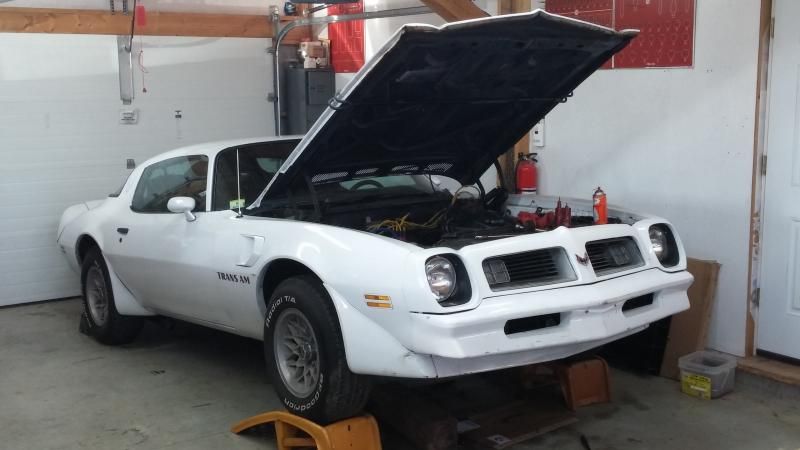
Short story: This car was in Ohio a few years ago.  A fellow from another forum checked it out for me.  The owner wanted to trade for a newer car, so we agreed to swap it for my clean '95 Formula.  His friend delivered it on a trailer and took my car away.  The Trans Am sat in my garage for a while.  It's rough around the edges and needed stuff to be inspected.  I had no time and no real money to give to it with two kids in school.  I sold it to a friend of mine the summer before last.  He drove it a few times and blew the fresh 400 engine.  Now, I have the car back.

I'm not sure if I will rebuild the 400 or do an LSX 5.3 swap.

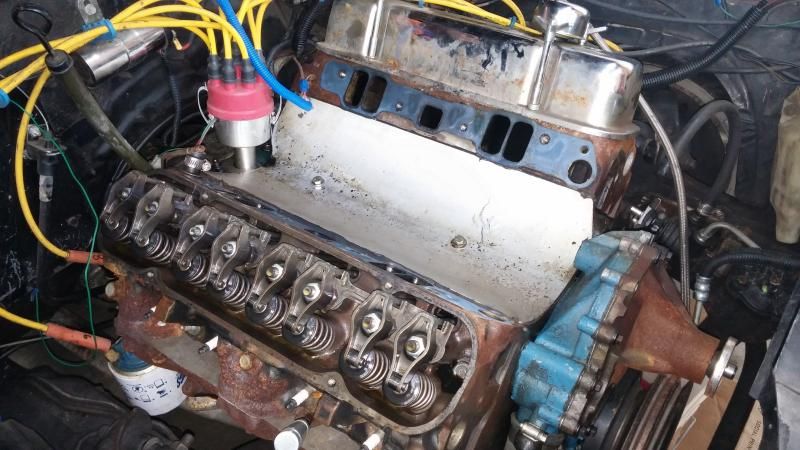
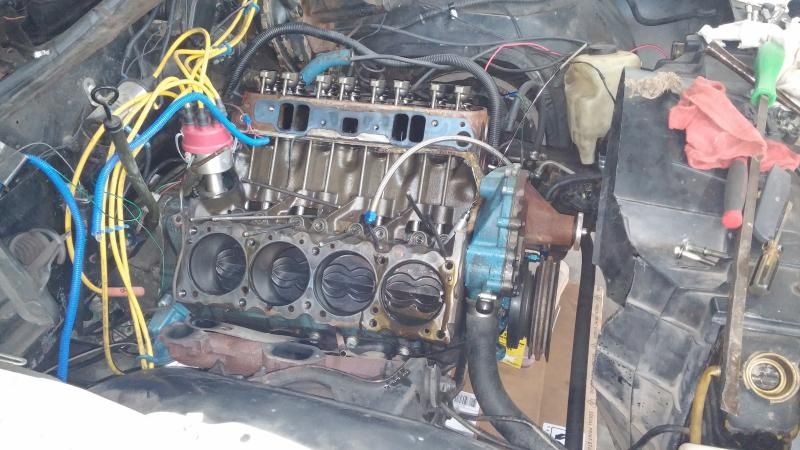
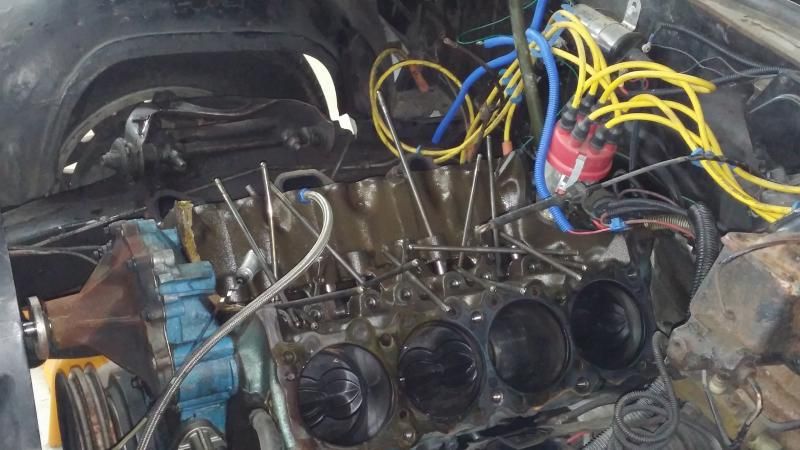
I started working on the car today.  I know the engine has to come out, so I started removing the top end to reduce the weight of what will be on the engine crane.  Lots of very "cob job" type work has been done on this poor thing over the years.

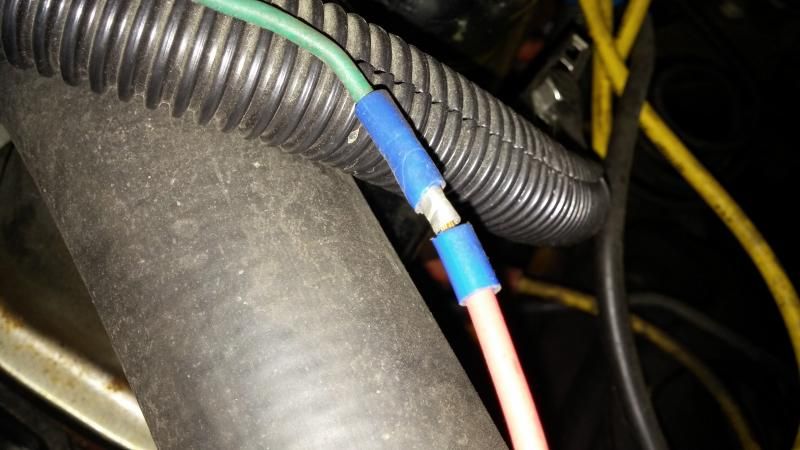
Lots of wiring like this or worse


This is not a factory Pontiac valley pan.  Maybe it's homemade?  It certainly was just sealed with a large gloppy bead of RTV


Thankfully, all the exhaust bolts came out easily, other than some on the DS that were difficult to access.

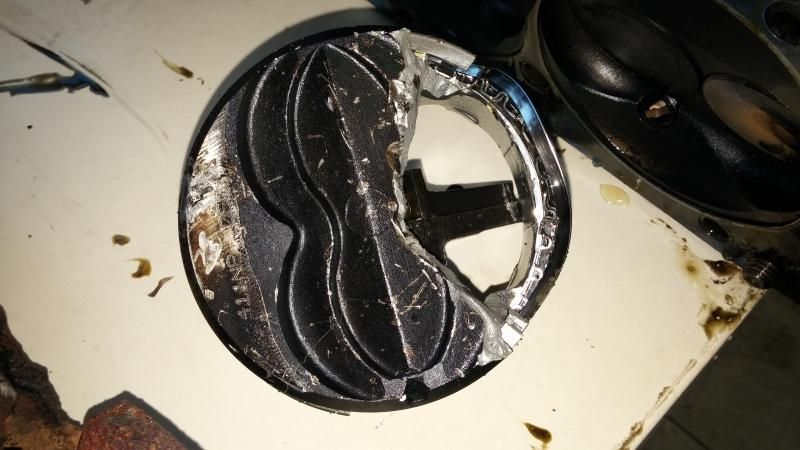
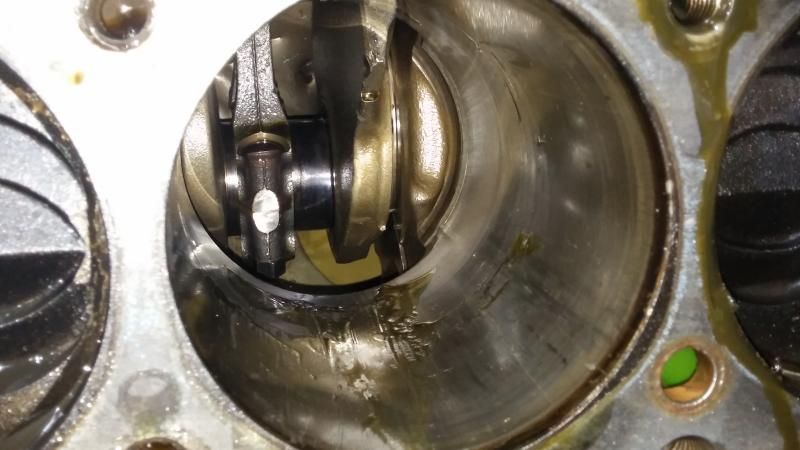
Dead center of this pic you might notice a piece of something in the lifter valley.  I surmised it was a piston, but wasn't sure.  Removing the PS head revealed intact pistons.


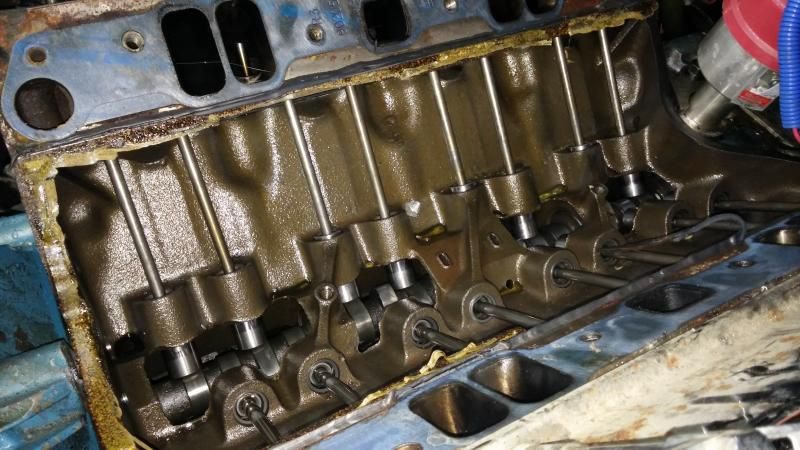
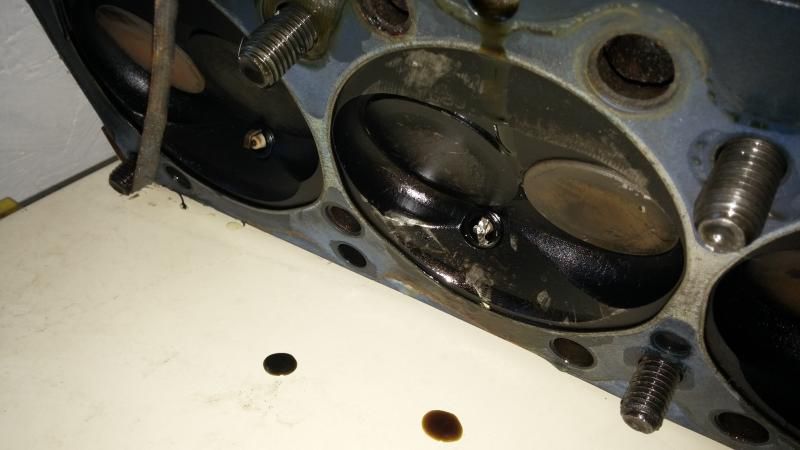
Removing the DS head revealed this


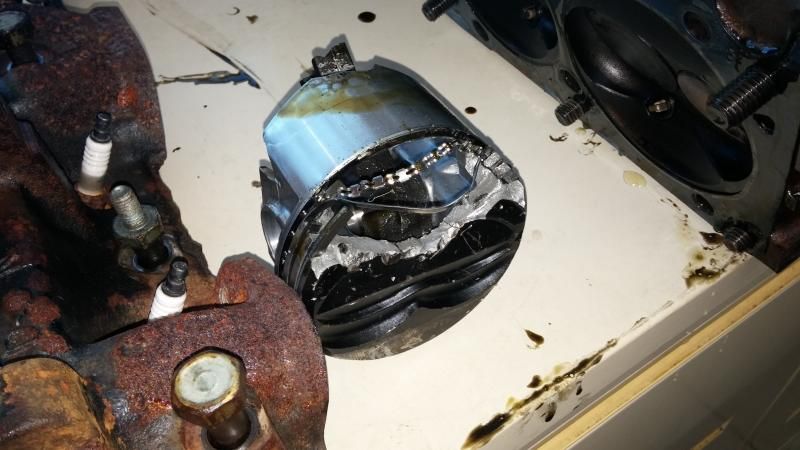
It also revealed a smashed plug.


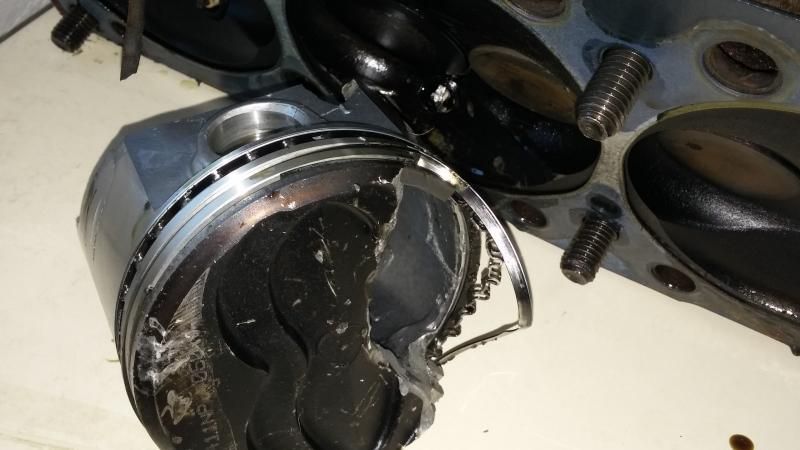
The little piece of something in the lifter valley was a part of the piston, which must have gotten sucked up into the intake valve and dumped there.

You can see this cylinder wall took some damage.  The rod broke, the piston flew up, and then the rod slapped around inside the oil pan for a bit before punching a hole through it.  Not sure what kind of damage I will see on the bottom end once I get in there.


That's where I had to stop for now.  I'm going to get my engine hoist assembled and move my engine stand from the old barn into the new barn and hopefully pull it soon.

Offline Bull

  • Jr. Member
  • *
  • Posts: 90
Re: Bull's 1976 Trans Am Project
« Reply #1 on: December 07, 2014, 11:08:42 PM »
Well, despite it being "crickets and tumbleweed" in here, I am going to post some update pics from the last couple weeks.


Offline Bull

  • Jr. Member
  • *
  • Posts: 90
Re: Bull's 1976 Trans Am Project
« Reply #2 on: December 07, 2014, 11:09:29 PM »
Removed a few small items from the firewall the other night (wiper motor, coil, "custom" HVAC block-off plate and "custom" coil bracket.

Pulled the PS bucket seat and pulled the carpet up.  Plenty of surface rust, some pinholes.  Not sure what that will become after removing the loose stuff and treating the surface.


Small piece of aluminum sign for "custom" coil bracket, and a sheet of aluminum for "custom" block-off plate. :eyecrazy:


If you are in the area and want to buy some seemingly new racing buckets, let me know.  I won't be using them.


Offline Bull

  • Jr. Member
  • *
  • Posts: 90
Re: Bull's 1976 Trans Am Project
« Reply #3 on: December 07, 2014, 11:09:55 PM »
I had a little time yesterday to spend in the garage and I used it to disassemble the 400.  Now I can get it back on the engine lift, wheel it to a bay door, and get it the heck out of here so I have some floor space back. 

I bought this special aluminum socket years and years ago.  It fits over the snout of a Pontiac crack and engages the "key" there.  Makes turning the engine over a breeze.


I don't know how well you are able to see it, but the journal on which the rod that snapped was attached is dark and scorched.  I found a number of other rod bearings that also looked like they had failed.  Not sure what caused the initial failure and what is a result of the engine being destroyed by all that exploded metal grit circulating around until it died.


Better view of my new "ventilation" hole.


Not sure the crank is worth saving, but I put it in my pile of parts for now.  Parts of the counterweights have big gouges in them.


Trash.  A second piston, visible at bottom, cracked when it fell out of the bore (I was pushing it from the back while the block was upside down.  It landed in a pile of kitty litter, not on a hard surface.  It broke so easily I wonder whether it was already cracked before it came out...?


The name "Brent" is visible in several places on the block and crank.  It's the name of the fellow I got the car from.


Not big progress this weekend, but some progress at least.

Offline tata

  • Sr. Member
  • ***
  • Posts: 609
Re: Bull's 1976 Trans Am Project
« Reply #4 on: December 08, 2014, 05:16:06 AM »
Wow, great pics.  Can't believe how trashed the engine is.  But it will be nice when it's all done.

Offline gilbertsta

  • Sr. Member
  • ***
  • Posts: 1125
  • "Live Like You Are Dying"
Bull's 1976 Trans Am Project
« Reply #5 on: December 08, 2014, 05:42:50 AM »
Cool thread and pics. Just curious what  is the casting number of the heads that were on this engine?  I didn't see any cross hatch in the cylinder, the engine must of had a few miles on it. Nice transmission TCI, is it a 400?
« Last Edit: December 08, 2014, 05:44:53 AM by gilbertsta »

Offline Bull

  • Jr. Member
  • *
  • Posts: 90
Re: Bull's 1976 Trans Am Project
« Reply #6 on: December 13, 2014, 10:17:42 PM »
Cool thread and pics. Just curious what  is the casting number of the heads that were on this engine?  I didn't see any cross hatch in the cylinder, the engine must of had a few miles on it. Nice transmission TCI, is it a 400?

I'll check the heads next time I am out there.  The engine supposedly had very few miles on it since being rebuilt by the previous owner, as in maybe a few hundred.  But, who knows?  I do know he had it rebuilt, as his name is written in yellow on several areas of the inside of the engine.

The theme here s going to be geologically slow progress, like how the earth's plates move.  I am trying to focus on enjoying the process, which is something that I have missed out on with some other projects, and it killed them.

I had a brief window of time to work in the garage, so after some cleaning I removed the swaybar and attempted to pull the shocks.  Three out of four of the stupid little clips that the lower shock mounts to snapped.  They are up in the perch for the spring just spinning around now.  Access to them sucks since the coil spring is in the way.  I was able to get one out by getting needle-nosed vise grips clamped in such a way at the clip couldn't spin.  I am having no success with this trick on the driver's side.  I'm sure I will get them out eventually but if anyone has any tips, I'm all ears.

The thought crossed my mind today while surveying the car and realizing how slow progress will be that I opened a can of whoop-a** on my own self.  On the other hand, the car is so so solid overall, and such an uncommon year from what I can tell that it deserves to be "restored," to the extent that the work I will be able to do qualifies for that term.  Everything is so greasy and nasty and cobbled together, rubber bushings disintegrating everywhere, interior exhibiting Hacksaw Jim Duggan craftsmanship that I keep telling myself "this needs to happen."


Offline b_hill_86

  • Sr. Member
  • ***
  • Posts: 754
  • Sterling to Starlight
Re: Bull's 1976 Trans Am Project
« Reply #7 on: December 14, 2014, 11:10:55 AM »
I'll be following this thread so please continue to post updates.
-Brian-

1977 Trans Am 400 4 speed hardtop

Offline Bull

  • Jr. Member
  • *
  • Posts: 90
Re: Bull's 1976 Trans Am Project
« Reply #8 on: December 14, 2014, 11:12:58 AM »
I'll be following this thread so please continue to post updates.

I will, and thank you for following along.

Updates might be pretty small some weeks! 

Offline b_hill_86

  • Sr. Member
  • ***
  • Posts: 754
  • Sterling to Starlight
Re: Bull's 1976 Trans Am Project
« Reply #9 on: December 15, 2014, 12:52:56 AM »
Preaching to the choir :)
-Brian-

1977 Trans Am 400 4 speed hardtop

Offline Bull

  • Jr. Member
  • *
  • Posts: 90
Re: Bull's 1976 Trans Am Project
« Reply #10 on: December 25, 2014, 01:31:16 AM »
On Saturday I had a small amount of time to play in the garage.  I used my new IR 118MAX air hammer and OTC Stinger pickle fork kit to first chisel away the old shock, then break the tie rod joint and disconnect all of the steering linkage.  I am sure many of you have had air hammers for decades, but for me this is a "how did I wait so long??" type of deal. 


"][/URL]


I went out there late tonight to begin to work on removing the front coil springs.  I really do not enjoy dealing with these.  The potential energy stored in them unnerves me.  I bought the reputed best internal spring compressor I could find (OTC 7045B) and it does give me more confidence than the hook type.  However, I don't have enough experience to know whether I am doing things correctly.  I followed the directions from OTC to the letter in terms of setting up the tool.  I turned it to compress the spring until it just started to twist in its pocket.  OTC says to then remove the two "pivot" bolts securing the inboard side of the lower control arm, drop the compressed spring/tool as a unit and then relieve tension on the spring.

I am not in love with this idea.  I'd rather leave those two control arm bolts there and break the ball joint while keeping a jack under the control arm, then lower the arm and gradually relieve the tension on the spring until it's totally sprung and can be pulled out of the pocket.  This is what I started doing, but it was after midnight and I was feeling tired, so I stopped.  Not the kind of job to do when you are tired!

If anyone has any tips for the process, I'm all ears.


I did pop the ball joint with my air hammer.  I kept the castle nut in place but loosened. 


I don't feel great confidence in this particular chain, but am hoping it would contain the spring if something went awry.  I can't fit a big beefy chain in between the coils while I am compressing them.

Offline tata

  • Sr. Member
  • ***
  • Posts: 609
Re: Bull's 1976 Trans Am Project
« Reply #11 on: December 25, 2014, 11:30:36 PM »
Use the spring compressor. As long as there on good, you are safe..jack can slip, lose pressure, and not as safe. Put them on, lay the springs down and undo the springs is the safest way.

Offline b_hill_86

  • Sr. Member
  • ***
  • Posts: 754
  • Sterling to Starlight
Re: Bull's 1976 Trans Am Project
« Reply #12 on: December 26, 2014, 12:21:57 AM »
Does that compressor tighten from the bottom or the top? It looks like the bottom which if that's the case it may be hard to compress the spring enough to get it out of that upper spring pocket. Mind you, I've never done this before. It's just a project i've been planning for a while. Any time i've ever seen it done though the compressor was tightened from the top and the spring was slipped out of the bottom spring pocket. That may be why OTC wants you to remove the 2 bolts from the lower A arm.

This may help a little. http://www.78ta.com/HTAF/index.php?topic=39272.0
-Brian-

1977 Trans Am 400 4 speed hardtop

Offline Bull

  • Jr. Member
  • *
  • Posts: 90
Re: Bull's 1976 Trans Am Project
« Reply #13 on: December 28, 2014, 12:04:03 AM »
I had a nice chunk of time to work on the car today since my buddy was in town and my wife understands that even a recluse like me needs social time now and again.

We took more precautions than the average gearheads might, but both agreed that the coil springs needed to be respected and going slowly was preferable to gaping flesh wounds.  Some of you guys might laugh at the approach, though.

The OTC spring compressor really is a nice design.  I installed it and compressed the spring, then popped the lower ball joint while keeping a floor jack under the outside of the control arm.  Next we let the jack down a bit to see what the spring would do and let it begin to drop.  After that we set up a 15 ton bottle jack under the inboard side of the control arm and removed the two "pivot" bolts fastening that part of the arm to the sub-frame.  Once those bolts were out we let both jacks down incrementally while working to free the lower control arm.  After the arm was out, my buddy used a large prybar to keep the spring from dropping out of the pocket while I got on the ground to begin backing the spring compressor tool off and releasing tension on the spring.  I liked the idea of the spring being in the pocket and chained to the sub-frame until it was totally stretched.  Handling it while "live" and doing it then just gave me the willies.  It worked well and I am very happy that this job is now safely completed!


Gross and huge rats' nest from inside the spring pocket.


I will need to press out the control arm bushings and am prepared for that to suck.  I do not have any kind of press and am open to some suggestions.  I was thinking of picking up the OTC ball joint press since I will need to press new joints in at some point.  Whether that could also do the bushings for the shafts on the upper control arms I don't know.  If you have ideas speak quickly because Zoro's flash sale on Monday is when I am going to try to pick up some tools for this project.

Thanks for reading!

Offline Bull

  • Jr. Member
  • *
  • Posts: 90
Re: Bull's 1976 Trans Am Project
« Reply #14 on: December 31, 2014, 01:36:11 PM »
Oh yes, I am committed alright.  To paraphrase Macbeth: "I am in [grease] stepped in so far that, should I wade no more, returning would be as tedious as going forward."

I dragged myself out of the warm house a few nights ago to peck away at the car for an hour or so.  Thank goodness for my torpedo heater.

I got the engine mounts off the frame and also the steering box.  I took the brake booster and master off the firewall, too.  I figure that most of these parts will be replaced since I am going through all this trouble, but the steering box is only a year or so old, so I will just plan on cleaning and painting it.


I don't know that I am going to worry too much about trying to keep the car original.  I might as well build it to suit my tastes.  That likely means that it won't be white, although if I do try to paint it myself that would be the most forgiving color.  I think a nice blue would look good, complete with complementary bird decal on the hood.  I love those things.  I've been swinging back towards the idea of an LSx swap again, too.  The custom wiring or other work needed to do that intimidates me a little since I am about as skilled as a Cro-Mag with a club.  Thankfully, the internet is a good lifeline.