Author Topic: a bit of work on my 77 TA  (Read 69112 times)

0 Members and 1 Guest are viewing this topic.

Offline Schroeder

  • Sr. Member
  • ***
  • Posts: 528
Re: a bit of work on my 77 TA
« Reply #15 on: June 11, 2012, 10:43:42 PM »
I broke down and bought an engine stand.  After I'm done I'll let it go to anyone here who needs it because I probably will not be needing it again.  Anyway, lining it up and getting it on the stand took me awhile.  I had to shim it here and there too.  I hope I mounted it right.  it is impossible to turn!  I had to use a cheater bar to rotate the engine and lift the front end to take some of the stress off the stand.

Tomorrow night the oil pan is coming off and I'm going to see what all needs to be done.  The crank may come out and I hopefully start ordering gaskets and other needed parts!

Do you guys all get your corporate blue engine paint from summit racing?  I'm thinking I'll only need a pint.  I'll only be painting this engine.


Offline joe d

  • Adv. Member
  • ****
  • Posts: 2113
Re: a bit of work on my 77 TA
« Reply #16 on: June 12, 2012, 05:26:20 AM »
yes the engine stands have to be shimmed to accomodate multiple engine types, i always used spacers have seen some use washers (not recommended)
1979 ws6 trans am (current project)
2005 mercedes s55
2001 dodge durango
1980 SE trans am (new current project)
1971 Monte Carlo
the 5 p's "perfect planning prevents poor performance"

Offline Schroeder

  • Sr. Member
  • ***
  • Posts: 528
Re: a bit of work on my 77 TA
« Reply #17 on: June 12, 2012, 10:15:06 PM »
Not a lot done tonight.  I just got the oil pan off and began loosening the crank shaft up.  Hopefully tomorrow I get it out.  The rear main indeed seems to have been put in crappily.

Here is a link to the crankshaft pictures

http://s1245.photobucket.com/albums/gg588/Schroeder14/crankshaft%20rear%20main%20and%20gaskets/

Offline joe d

  • Adv. Member
  • ****
  • Posts: 2113
Re: a bit of work on my 77 TA
« Reply #18 on: June 13, 2012, 05:49:25 AM »
that lower end looks fresh from the pics and the timing chain has been replaced, why are you pulling the crank? the pick up looks to be packed with crap from the previous build and should be replaced, the bearings seem good though from your excellent photos appears to have been assembled a bit dirty but i have seen worse, yes the front cover must come off to remove the crank
1979 ws6 trans am (current project)
2005 mercedes s55
2001 dodge durango
1980 SE trans am (new current project)
1971 Monte Carlo
the 5 p's "perfect planning prevents poor performance"

Offline Schroeder

  • Sr. Member
  • ***
  • Posts: 528
Re: a bit of work on my 77 TA
« Reply #19 on: June 13, 2012, 09:45:20 PM »
sorry...in case you haven't picked it up yet though I am not savvy with engine internals.  What are the pickups?  You think those bearings are good joe d?  I thought they looked good myself but wasnt sure

I am pulling the crank to replace the rear main because it leaks horribly.  I just ordered the graphite impregnated rope seal from butler performance earlier today!
« Last Edit: June 13, 2012, 10:24:59 PM by Schroeder »

Offline Schroeder

  • Sr. Member
  • ***
  • Posts: 528
Re: a bit of work on my 77 TA
« Reply #20 on: June 13, 2012, 10:32:52 PM »
My new tranny parts (rebuild kit, reverse gears, and fourth gear/input shaft) came in yesterday.  Today my special tranny wrench came in so I was able to actually start ripping the muncie up for the rebuild!  I got it all apart.  Getting the speedo gear off really gave me some trouble but I was able to eventually get it off by placing it through some holes on our table saw with some mounts from our press.  Here is a picture of this work place.  A barrel full of aluminum cans caught the main shaft and gear cluster when it fell when the speedo gear separated from the output shaft.


Here is the torn down muncie.  I wire brushed nearly all the housing as best I could to get the excessive crap off to make sandblasting easier.


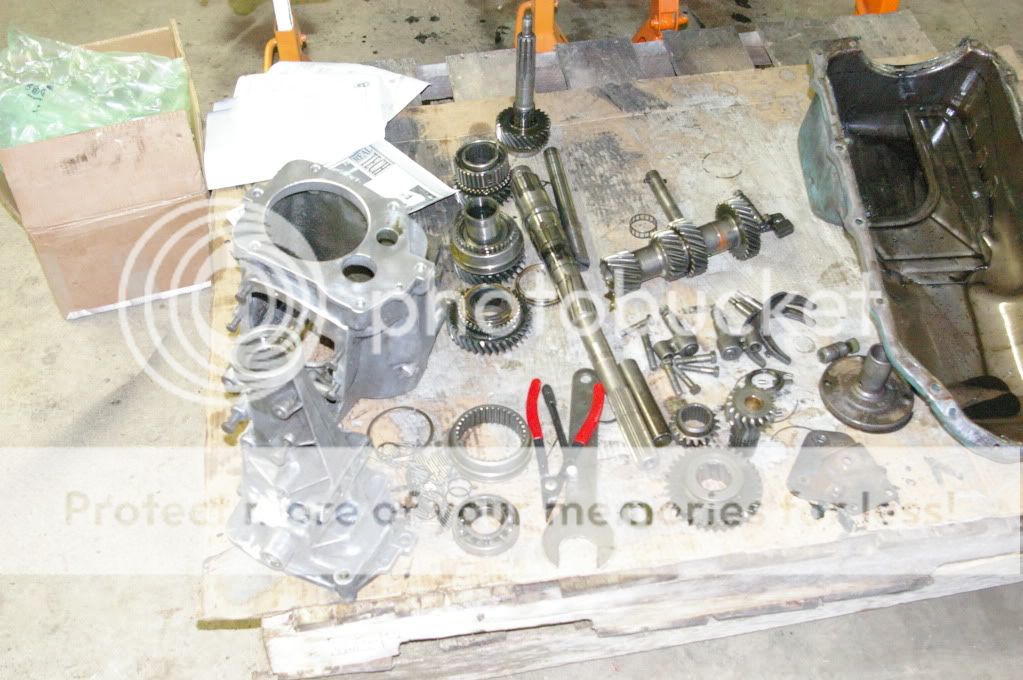
Another pic of the cleaned up housing and tranny parts.


Old input shaft, meet new input shaft.  The new one is on the right in case you guys can't tell.  ;)


I have a lot going on for the rest of the week, but I'm hoping on Monday I can sand blast AT LEAST the transmission (I have a LOT of stuff I COULD sand blast right now, but won't need it done for awhile yet).  Then I can start the actual rebuild.  Do you guys paint your tranny housings or do you just leave them bare cast metal?


Offline Schroeder

  • Sr. Member
  • ***
  • Posts: 528
Re: a bit of work on my 77 TA
« Reply #21 on: June 14, 2012, 10:27:01 PM »
Here are some pics of the bit of work I got done tonight.  Where do you guys get your corporate blue for repainting engines from?  Also, where do you get the silver for repainting the silver underbody parts on these cars?  I'm going to paint my Muncie that color.


Offline joe d

  • Adv. Member
  • ****
  • Posts: 2113
Re: a bit of work on my 77 TA
« Reply #22 on: June 16, 2012, 09:01:13 AM »
that is a great blasting box
1979 ws6 trans am (current project)
2005 mercedes s55
2001 dodge durango
1980 SE trans am (new current project)
1971 Monte Carlo
the 5 p's "perfect planning prevents poor performance"

Offline iceman

  • Member
  • **
  • Posts: 352
Re: a bit of work on my 77 TA
« Reply #23 on: June 16, 2012, 07:12:17 PM »
As far as shimming goes for an engine stand, I've never done that. I use all 4 mounting points on the block where the trans bolts to. This may ease the rotation of the motor some on the stand. I would have run the trans cases and oil pan thru a parts washer instaed of sandblasting them. I have the worst luck with not getting all the sand particles out before assembly... Looks like a pretty big project though. I think if you can get the crank up a little in the mains to slide the new seal in, that would be great instead of completely removing it. That's a big job... Mike
Check out my facebook page: River City Muscle LLC
1969 Pontiac GTO
1971 Pontiac LeMans Sport Convertible
1977 Pontiac Trans Am

Offline Schroeder

  • Sr. Member
  • ***
  • Posts: 528
Re: a bit of work on my 77 TA
« Reply #24 on: June 17, 2012, 08:20:44 AM »
As far as shimming goes for an engine stand, I've never done that. I use all 4 mounting points on the block where the trans bolts to. This may ease the rotation of the motor some on the stand. I would have run the trans cases and oil pan thru a parts washer instaed of sandblasting them. I have the worst luck with not getting all the sand particles out before assembly... Looks like a pretty big project though. I think if you can get the crank up a little in the mains to slide the new seal in, that would be great instead of completely removing it. That's a big job... Mike

iceman, I now have the tranny parts sitting in my parts cleaner to get all the remaining sand particles out that may not have come out with the initial cleaning I did when I blew compressed air all over it.  In the process of soaking in the parts cleaner the magnet in the bottom of my transmission case came off.  Our cleaner is really more like a VERY harsh carb cleaner so it ate the adhesive that holds the magnet down.  It seemed like REALLY strong adhesive too!  What do you guys suggest I use to re-glue the magnet to the bottom of the trans case?  Obviously I want something strong so that magnet doesn't come off and hurt anything in the transmission!  I was thinking about using 3M window weld.  I have some of it and I know it's super strong.   I don;t think trans oil would lower its integrity but I dont know. 

So, you think I should take off the timing chain and all that, then lift it a half inch with an engine hoist?  I'm just afraid that a piston will pop out if I don't completely remove it.  I don't wanna deal with the rings popping out and such.

Offline iceman

  • Member
  • **
  • Posts: 352
Re: a bit of work on my 77 TA
« Reply #25 on: June 17, 2012, 09:04:19 AM »
I'd look for a drain plug with a magnet on the end of it. Your local NAPA should be able to hook you up. As far as the crank goes, line up the marks on the chain(I'm assuming you have some sort of service manual-not to be insulting here) on #1 firing position, loosen the valvetrain nuts to take pressure off the cam so it doesn't move on you and slide the chain off and hang it on something not to disturb the gears in position. Then pull the main caps and set them on a clean towel in order and by hand or with the help of a buddy you should be able to lift the crank up out of the mains by hand and it should stay there to do what you need to. Make sure all the spark plugs are out and you only have to lift it up an inch or so to service the seal. Right now is a great time to wish GM kept the Pontiac motor in production longer than they did for refinements like they did for the SBC. A ONE piece seal would be great right about now. I am thankful that there's now a one piece oil pan gasket available. Looks like your making great progress on you car. Keep it up. I am envious of what people are getting done on thier rides on this site and yours is no exception. Nobody said it was easy. Great job and keep it up!.... Mike
Check out my facebook page: River City Muscle LLC
1969 Pontiac GTO
1971 Pontiac LeMans Sport Convertible
1977 Pontiac Trans Am

Offline joe d

  • Adv. Member
  • ****
  • Posts: 2113
Re: a bit of work on my 77 TA
« Reply #26 on: June 17, 2012, 11:17:38 AM »
epoxy it back where it was as that is where it belongs
1979 ws6 trans am (current project)
2005 mercedes s55
2001 dodge durango
1980 SE trans am (new current project)
1971 Monte Carlo
the 5 p's "perfect planning prevents poor performance"

Offline Schroeder

  • Sr. Member
  • ***
  • Posts: 528
Re: a bit of work on my 77 TA
« Reply #27 on: June 17, 2012, 02:28:36 PM »
I'd look for a drain plug with a magnet on the end of it. Your local NAPA should be able to hook you up. As far as the crank goes, line up the marks on the chain(I'm assuming you have some sort of service manual-not to be insulting here) on #1 firing position, loosen the valvetrain nuts to take pressure off the cam so it doesn't move on you and slide the chain off and hang it on something not to disturb the gears in position. Then pull the main caps and set them on a clean towel in order and by hand or with the help of a buddy you should be able to lift the crank up out of the mains by hand and it should stay there to do what you need to. Make sure all the spark plugs are out and you only have to lift it up an inch or so to service the seal. Right now is a great time to wish GM kept the Pontiac motor in production longer than they did for refinements like they did for the SBC. A ONE piece seal would be great right about now. I am thankful that there's now a one piece oil pan gasket available. Looks like your making great progress on you car. Keep it up. I am envious of what people are getting done on thier rides on this site and yours is no exception. Nobody said it was easy. Great job and keep it up!.... Mike

iceman, I may send you a PM with questions if I have any in a couple days when I get to the crank and rear seal.  Right now I'm rebuilding the Muncie.  Hopefully I get out to the shop today and get to paint it.  I took it out of parts cleaner this morning and high pressure washed it again to get any remaining grains of sand out.  I am confident they're all gone now!  I was worried, as you mentioned, that there would be sand left in it which would eventually ruin my bearings and seals...leading to another rebuild :-/    Again, I am now confident that this tranny is spotless of sand and clean enough to eat off!  Later when I get out there I want to run a rag over the exterior soaked with SEM solve, tape up the openings and shoot it with a couple coats of cast aluminum paint. 

epoxy it back where it was as that is where it belongs

Iceman and joe d, my dad suggested I use JB weld to hold the magnet down.  I did some reading and JB Weld is resistant to chemicals, petroleum, and temperatures up to 500F.  It sounds like we have a winner!  This is what I'll be using to hold the magnet down.  I want to set that in tonight to to allow the JB weld to st up for 24 hours.  Then tomorrow night (if I don't have to do any homework for an online class of mine) I hope to start putting it back together.  That should bring lots of nice pics for you guys! 

Thanks for the help and encouragement!

Offline joe d

  • Adv. Member
  • ****
  • Posts: 2113
Re: a bit of work on my 77 TA
« Reply #28 on: June 17, 2012, 03:34:49 PM »
JB Weld a good choice of epoxy, in the home remodeling business now so i refer to epoxy, when i was in the auto business it was always JB Weld, not to intrude but did i miss something about your lifting the crank or something? I saw Iceman said you should be able to something but missed part of the post, just curious
1979 ws6 trans am (current project)
2005 mercedes s55
2001 dodge durango
1980 SE trans am (new current project)
1971 Monte Carlo
the 5 p's "perfect planning prevents poor performance"

Offline Schroeder

  • Sr. Member
  • ***
  • Posts: 528
Re: a bit of work on my 77 TA
« Reply #29 on: June 17, 2012, 03:41:42 PM »
JB Weld a good choice of epoxy, in the home remodeling business now so i refer to epoxy, when i was in the auto business it was always JB Weld, not to intrude but did i miss something about your lifting the crank or something? I saw Iceman said you should be able to something but missed part of the post, just curious

Yes, I had planned on taking the crankshaft totally out to clean it and replace the rear main.  I had intended on taking the timing chain off, taking the bolts of the connecting rods out, letting the pistons sit in their cylinders, and lifting the crank out.  iceman has advised against it. 

iceman, joe d, or anyone who can answer...why must he spark plugs be removed to take the crank out and what does iceman speak of when he talks about lining the firing positions up on the timing chain?  Doesn't that come into play when I put the crank back IN??